Are static PDF training guides a thing of the past?
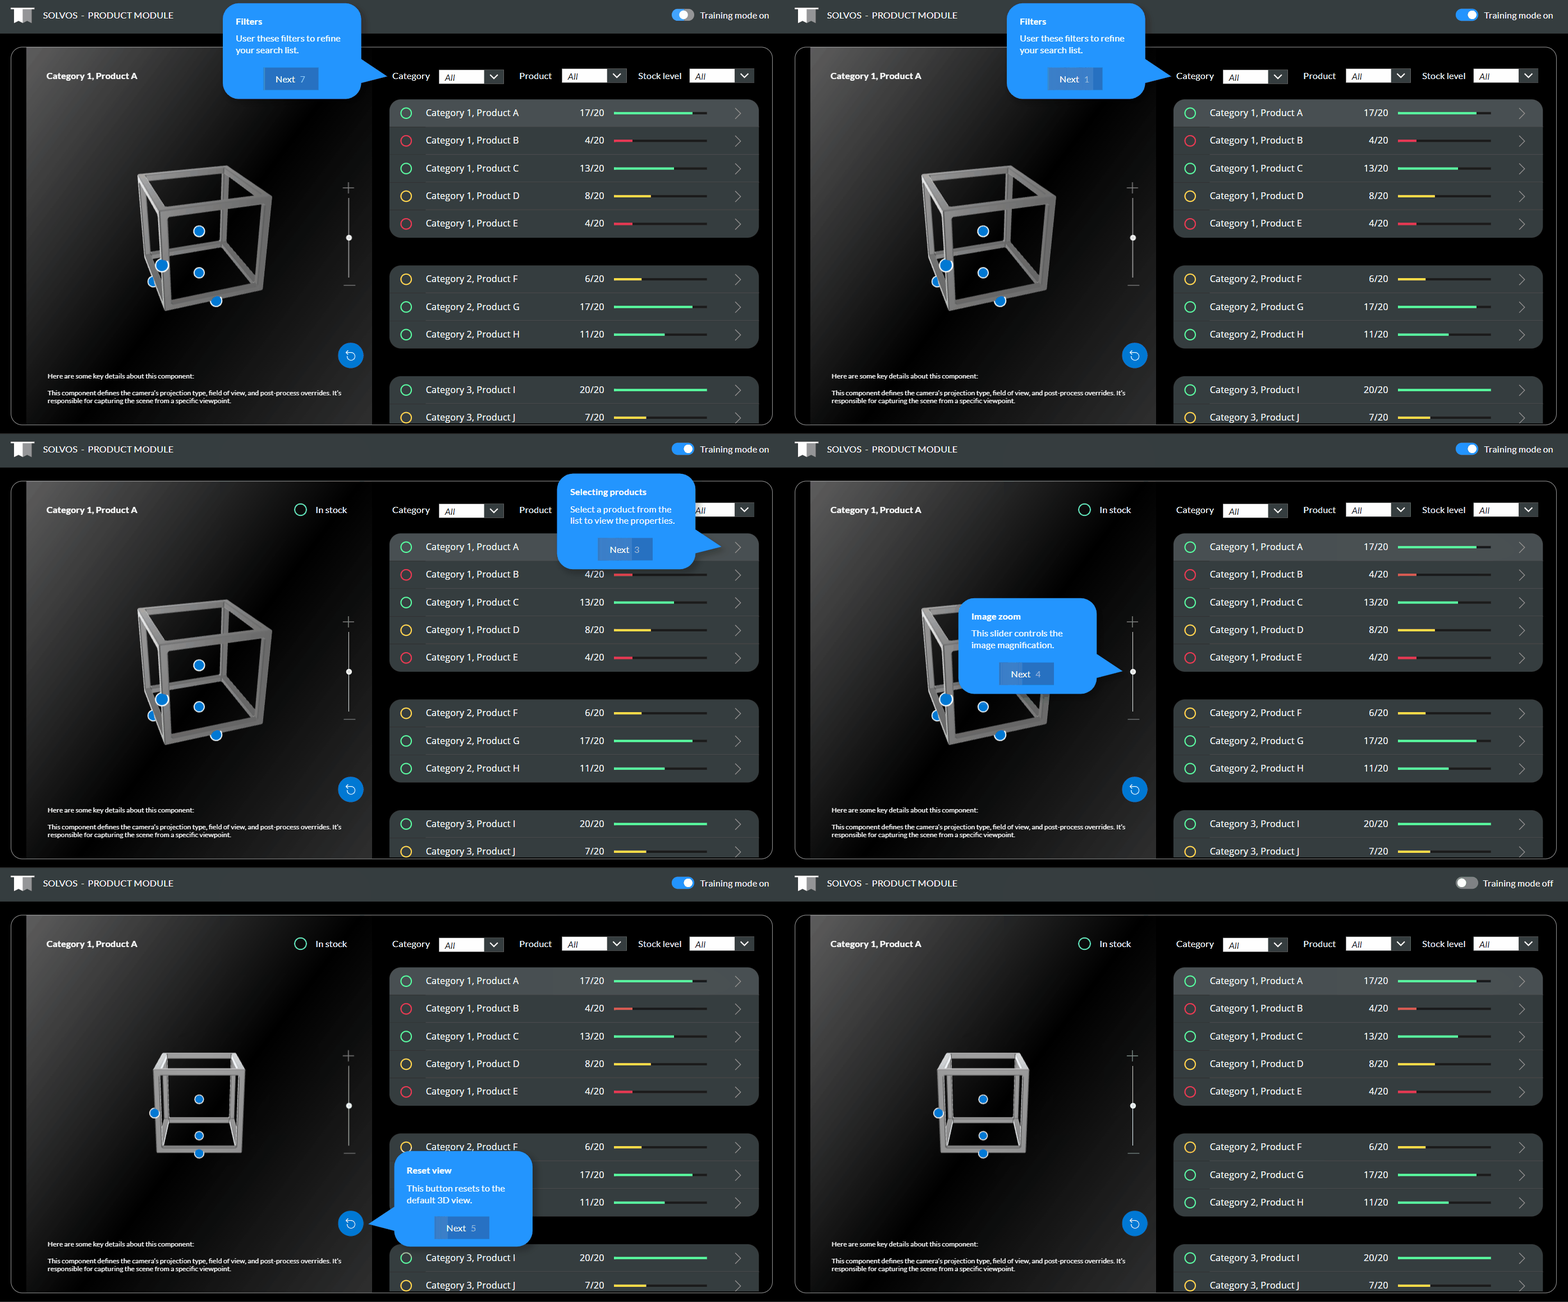
User adoption and training is critical to the success of application uptake within a business. This article shows how to create interactive prompts within Power Apps, designed to enhance the training process by highlighting features within a Power App. The number of clicks on different topics can be reported to provide training insights and behaviour analysis, indicating where training effort should be focused.

These countdown buttons automatically activate after a period of time. This article explains how to create these prompts using native Power Apps controls - without any custom code components.
Like the app UI? Check out my related article about gallery styling
Creating prompts
The basic technique required a global variable which controlled the visibility property of each specific prompt dialogue. The training mode was activated with a toggle switch, setting the variable to 1 and therefore displayed the first prompt. This numeric value then incremented after each prompt had been displayed. Deactivating the toggle reset the value to 0, meaning no prompts were shown.

OnCheck property of the toggle switch:
Set(gloVar_Tip, 1) //This activates the first promptOnUncheck property of the toggle switch:
Set(gloVar_Tip, 0) //This hides and resets the promptsOnSelect property of the 'Next' buttons:
Set(gloVar_Tip, gloVar_Tip+1) //This increments the global numerical value to the next numberVisible property of the prompt dialogues:
gloVar_Tip = 1 //This number is set manually to control each promptTip: The visibility setting was applied to a container in which all elements for the prompts were positioned.
I created the callout shapes with a drop shadow in SVG format.
You can download and copy the code in these .txt files into an Image in Power Apps:
Advanced styling - countdown buttons
A single timer was used to control all the countdown buttons within the separate prompts. The following properties were used for the timer control to achieve the desired effect:
Duration | 7000 |
Repeat | true |
Auto start | true |
Auto pause | false |
Visible | false |
OnTimerEnd | If(gloVar_Tip>0, Set(gloVar_Tip, gloVar_Tip+1)); //This increments the variable, providing it's greater than 0
If(gloVar_Tip>4, Reset(tgl_Training)); //This switches off the training mode toggle |
Start | gloVar_StartTimer //Either true or false |
Updated OnCheck property of the toggle switch:
Set(gloVar_Tip, 1); //This activates the first prompt
//Restart the timer from the beginning
Reset(tmr_TipTimer); Set(gloVar_StartTimer, false); Set(gloVar_StartTimer, true);
Updated OnUncheck property of the toggle switch:
Set(gloVar_Tip, 0); //This hides and resets the prompts
// Reset timer (but don't restart)
Reset(tmr_TipTimer)
Updated OnSelect property of the 'Next' buttons:
Set(gloVar_Tip, gloVar_Tip+1) //This increments the global numerical value to the next number
// Reset timer
Reset(tmr_TipTimer); Set(gloVar_StartTimer, false); Set(gloVar_StartTimer, true);
A slider control was used with the following properties to achieve the desired effect:
Default | tmr_TipTimer.Value |
DisplayMode | DisplayMode.View |
HandleFill | RGBA(0,0,0,0) //Transparent |
HandleSize | 10000 //Huge, so it disappears |
Max | tmr_TipTimer.Duration |
RailFill | RGBA(39, 113, 194, 1) |
RailThickness | 100 |
ValueFill | ColorFade(Self.RailFill, 10%) |
For more tips using sliders, check out this related article
I positioned a rectangular button, with a border radius of 0, on top of the slider. This gave the impression of a button fill animation. I set the Fill property to be transparent.
The countdown text was added as follows:
Round((sld_Prompt1.Max-sld_Prompt1.Value)/1000,0)This subtracts the dynamic slider value from the maximum value, converts it to seconds by dividing the number by 1000 and then rounds it.
Take it further
Develop your prompts further by adding images, videos, hyperlinks, polls, feedback, buttons and anything else you could possibly imagine. The aim is to minimise content on screen to reduce intrusion, and provide links to additional resources if required.
The number of button clicks can be stored and reported on over time to gauge interactions and provide training insights. This feedback can contribute towards focusing effort on additional training.
Summary
This article promotes the shift from static PDF training guides to interactive prompts within Power Apps using native controls to improve user training and application adoption. I showed how to control the visibility and timing of the prompts with some basic controls including a toggle switch, timers control, sliders and SVGs.
In-app training prompts are more engaging, more easily maintainable and can even help provide interaction insights. Remember, these interactive prompts can significantly improve user understanding and adoption of Power Apps features.
The are several methods to achieve these results and I look forward to hearing about other solutions or any feedback on this one.
Thank you for reading!


